Building an LSIF indexer for a low-code platform
The original company blog link no longer exists after Airkit was acquired
In the past few years of working at Airkit, I’ve been delving deeper and deeper into the fascinating realm of low-code. Amidst this eye-opening yet rather winding expedition, I’ve begun to appreciate the beauty of abstractions. By examining the Airkit’s abstract syntax tree (AST) and my journey of building a Language Server Index Format (LSIF) indexer, we will explore the power of abstractions in the context of a low-code platform.
What is Low-Code?
To understand what low-code is, we must first examine what computer programs and programming languages are. Computer programs are sets of instructions for the computer, and programming languages are abstractions, in the form of formal languages, for these sets of instructions. The amount of abstraction provided to a programming language defines how “high-level” it is. Effectively, abstractions are what make it possible to write programs in higher level code without thinking in terms of lower level code, to write programs in C without thinking in terms of assembly code, and to write assembly code without thinking in terms of logic gates.
At Airkit, we treat low-code as yet another layer of abstraction — a high level programming language that happens to be visual. As opposed to traditional text-based programming languages that require scanning and parsing to convert the source code into a parsed tree, which later gets converted into AST (abstract syntax tree), visual programming languages have structural editors that directly build the AST.
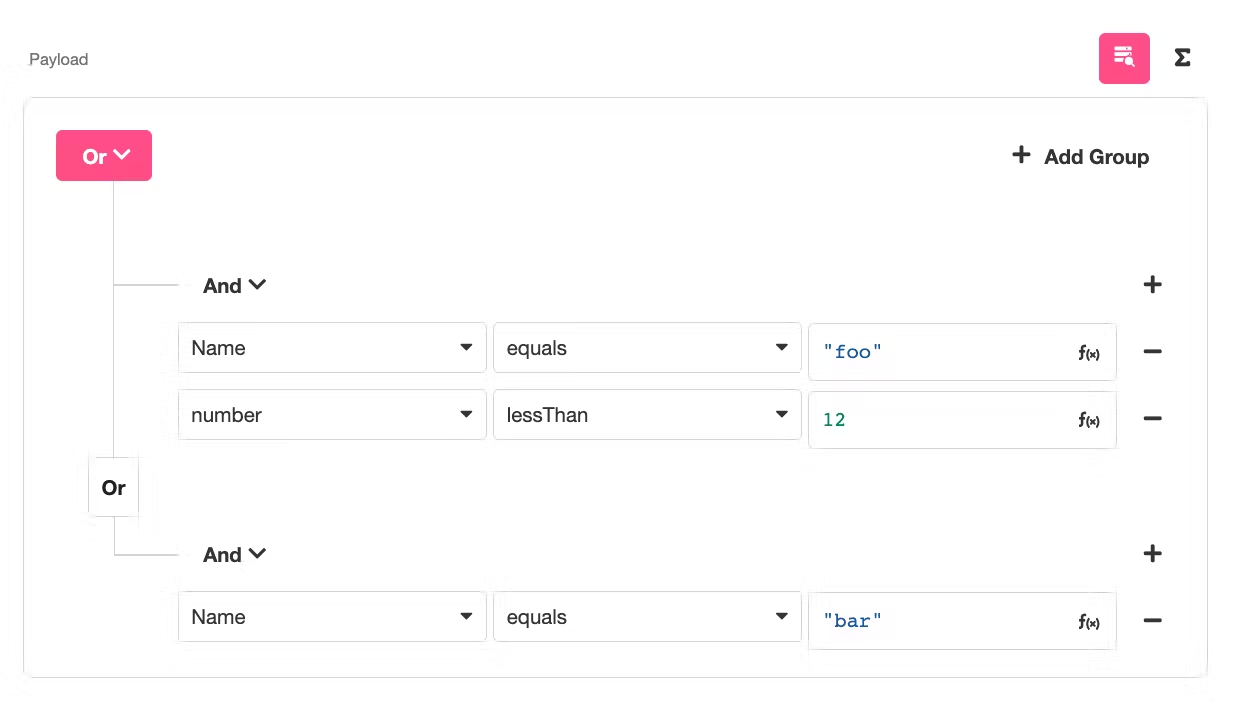
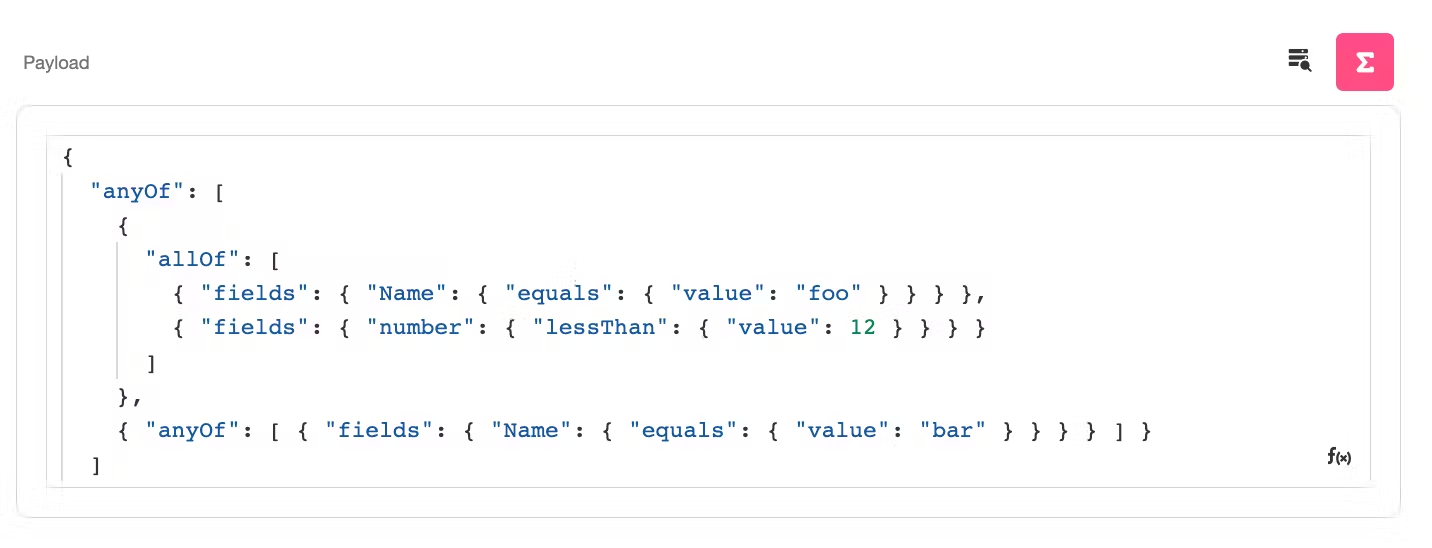
With the Airkit studio, developers can toggle between the visual mode and the expression mode, whichever one they prefer. The two figures above represent the exact same underlying code. This exemplifies what low-code is — a visual way of coding.
The Airkit AST
The goal of this blog isn’t to perform a deep dive on the Airkit AST. However, having an intuition of what an Airkit application looks like under the hood is useful to understand how Airkit works.
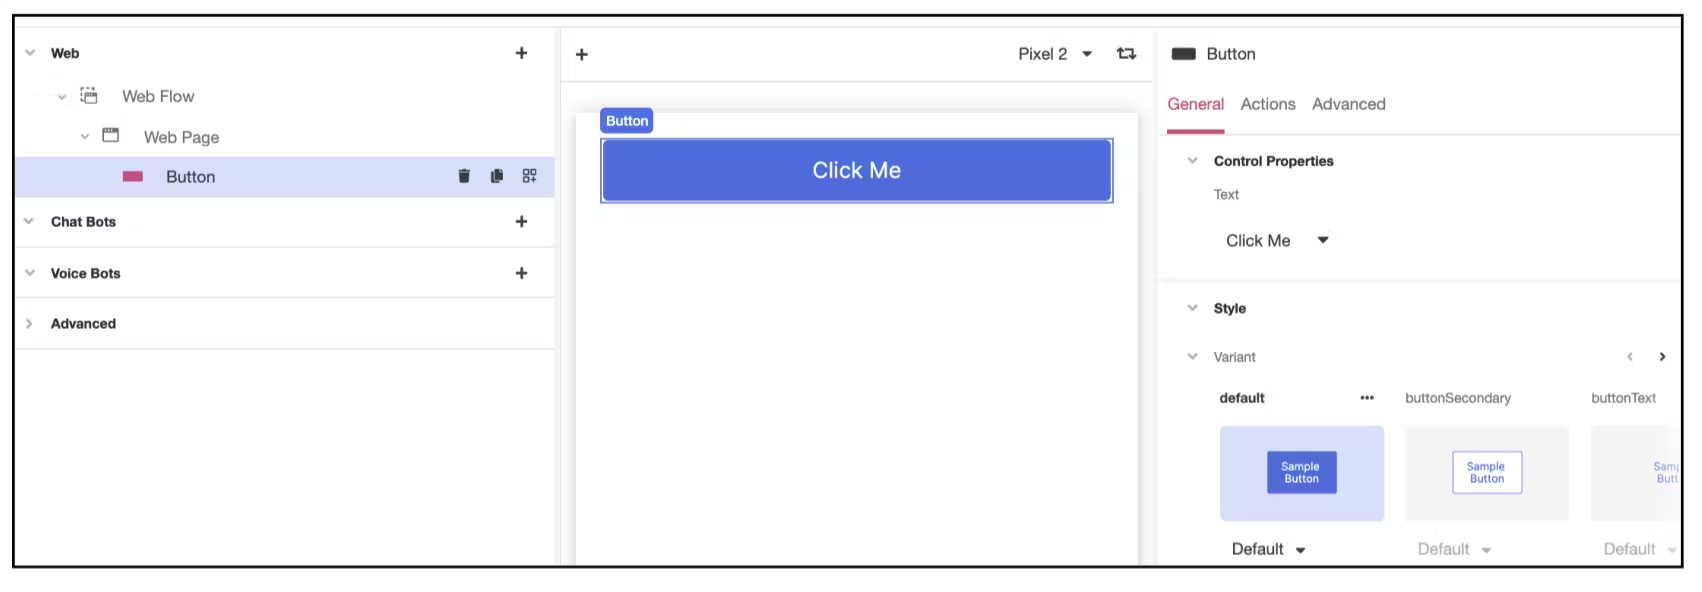
Figure 1: A Web Page with a simple button being built in Airkit Studio.
The AST for the button in Image 1 looks like this:
{
  "id": "16b24f80-913f-4485-ba55-90cbcac65592",
  "name": "Button",
  "text": {
    "value": "Click Me",
    "$schema": "/element/expression/binding/constant-binding.json",
    "safe": true
  },
  "$schema": "/element/control/button.json",
  "style": {...},
  "events": {
    "/element/event/button/on-click.json": {
      "args": [],
      "$schema": "/element/expression/function/run-action-chain.json"
    }
  }
}
This button is an instance of an Airkit Element, which is the most primitive building block for Airkit applications. There are many different kinds of element, and compound elements are built up from simpler ones. We can see that the button AST is actually a compound element comprised of elements that describe its text, style, and events.
The right-most panel in Image 1 is the inspector. An inspector is a collection of editors that allow users to modify an element and its sub-components. We can see that the button’s inspector has corresponding editors for the text, style, and events properties of the button element.
Using React as an Analogy
We have seen earlier how visual editors that comprise the Airkit studio are just syntactic sugar over Airkit elements. Similarly, in React, JSX is just syntactic sugar over React elements. For instance, this is how we could declare a button in React with JSX [citation: https://reactjs.org/docs/jsx-in-depth.html]
<Button color="blue" shadowSize={2}>
  Click Me
</Button>
The JSX is then compiled into:
React.createElement(
  "Button",
  {color: 'blue', shadowSize: 2},
  'Click Me'
)
which gets evaluated into a React element like this:
{
  "type":"button",
  "key":null,
  "ref":null,
  "props":{"color":"blue","shadowSize":2,"children":"Click Me"}
}
Airkit Studio: The Airscript IDE
The Airkit Studio is an IDE, just as XCode, VSCode, and IntelliJ are. An IDE normally consists of the source editor, debugger, navigational / refactoring tools, error trays etc. These are tools that help a programmer write syntactically and semantically correct programs and are all features in Airkit studio that we work on.
In the remaining post, I will unveil the mystery behind how Airkit supports navigational and refactoring tools such as finding references, renaming variables, and more.
So how does Airkit provide accurate code navigation and refactoring to users within milliseconds? The answer lies in Language Server Index Format (LSIF).
What is LSIF?
LSIF is a standard format for programming tools (language servers, IDEs, etc) to persist knowledge about a code space. A good analogy for LSIF is a database index, which allows a database query to efficiently retrieve data from a database at the cost of additional writes and storage space to maintain the index.
LSIF is an index that allows a a code viewing client (e.g., a code editor) to provide features like autocomplete or go-to-definition without requiring a language analyzer to perform those computations in real-time.
If you ever wonder how IDEs like Visual Studio Code provide the same set of refactoring/navigational tools to so many different programming languages, it is because these IDEs have clients that are powered by language agnostic protocols like LSIF. So as long as there is a LSIF indexer for a programming language to convert files of that language to the LSIF data format, the IDE can work with that language.
Choosing the LSIF as Airkit’s data model for indexing was easy. After some research, we felt, as opposed to building our own in-house protocol or using other indexing format, LSIF was simple to understand, is supported in many languages, and has ongoing support by several companies like Sourcegraph and Github/Microsoft.
Quick LSIF Example
To illustrate how LSIF supports efficient code navigation, we will use this code snippet as an example (from official LSIF specification). [citation https://microsoft.github.io/language-server-protocol/specifications/lsif/0.4.0/specification/]
function bar() {
}

function foo() {
  bar();
}
The JSON output below is the LSIF format for the 5 lines of javascript above:
// The bar declaration
{ id: 6, type: "vertex", label: "resultSet" }
{ id: 9, type: "vertex", label: "range", start: { line: 0, character: 9 }, end: { line: 0, character: 12 } }
{ id: 10, type: "edge", label: "next", outV: 9, inV: 6 }

// The bar reference range
{ id: 20, type: "vertex", label: "range", start: { line: 4, character: 2 }, end: { line: 4, character: 5 } }
{ id: 21, type: "edge", label: "next", outV: 20, inV: 6 }

.... more nodes and edges

// Add the bar reference as a reference to the reference result
{ id: 28, type: "edge", label: "item", outV: 25, inVs: [20], document:4, property: "references" }
As you can see, LSIF is just a collection of nodes and edges. Figure 2 below shows a visual representation of the generated LSIF graph.
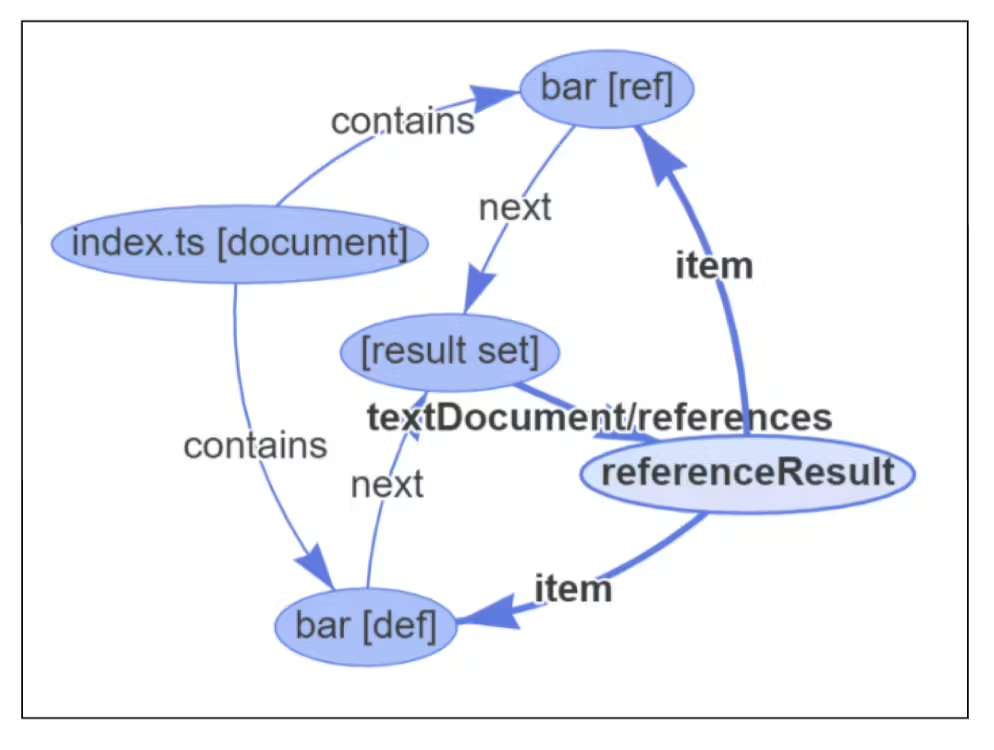
Figure 2: Visual representation of LSIF (citation)
The bar function declaration is labeled as bar[def] in the visual graph. We can also find the corresponding node in the JSON output: the node with id 9. The bar[def] node is a range node, because it represents a symbol in the program ranging from line 0 character 9 to line 0 character 12. Range nodes are uniquely identified with starting and ending line/characters.
So how does VSCode use LSIF index to allow a user to find all references for the bar declaration? The user would first hover over the bar declaration and then click the find-all-references button. Note that hovering over position denoting the “b” in bar and the “r” in bar will return the same range node. The VSCode client would submit a language server request, containing the cursor position, to the language server.
The algorithm to find all references for a node is as follows:
- Use the cursor position to identify the range node with the line number and character count. The identified node is bar[def].
- Traverse to [result set] by taking the next edge. The result set has outgoing edges corresponding to the type of query a user can make about a node, such as references or definition.
- Take the textDocument/references node to the referenceResult node. The referenceResult node contains one or more item edges corresponding to the references of a node.
- Following the two item edges bring us to bar[def] and bar[ref], the two references for bar[def].
Airkit’s LSIF
For those of you who aren’t familiar with how Airkit’s studio works, I suggest taking a look at this quick Airkit 101 video.
To demonstrate how LSIF is used in Airkit Studio, we will continue to work with our button example from earlier. To start off, we need a pair of definition and reference to work with.
We will first create a variable called foo.

This is the AST for the variable declaration:
{
    "id": "76faf168-8789-45ca-a8c6-960982f704a0",
    "required": true,
    "appObjectType": {
        "collection": "scalar",
        "primitive": "string",
        "$schema": "/element/app-object-type.json"
    },
    "binding": "foo",
    "$schema": "/element/variable.json"
}
Next, let’s create a reference node for the foo variable. Instead of just a plain “Click Me”, we now use a dynamic expression that contains the foo variable.
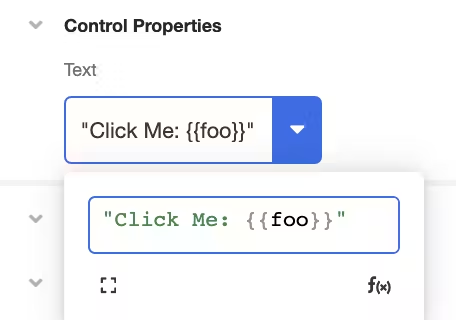
Figure 4: Using an expression with a variable for the text of the button
The updated AST for the button is:
{
    "id": "16b24f80-913f-4485-ba55-90cbcac65592",
    "name": "Hello: ",
    "text": {
        "strings": [
            "Hello: "
        ],
        "elements": [
            {
                "binding": "foo",
                "$schema": "/element/expression/binding/variable-binding.json",
                "safe": true
            }
        ],
        "$schema": "/element/expression/binding/string-interpolation.json",
        "safe": true
    },
    "$schema": "/element/control/button.json",
    "style": {...},
    "events2": {...}
}
Now that we have a variable definition and a variable reference, LSIF will connect the two range nodes as shown in Figure 5.
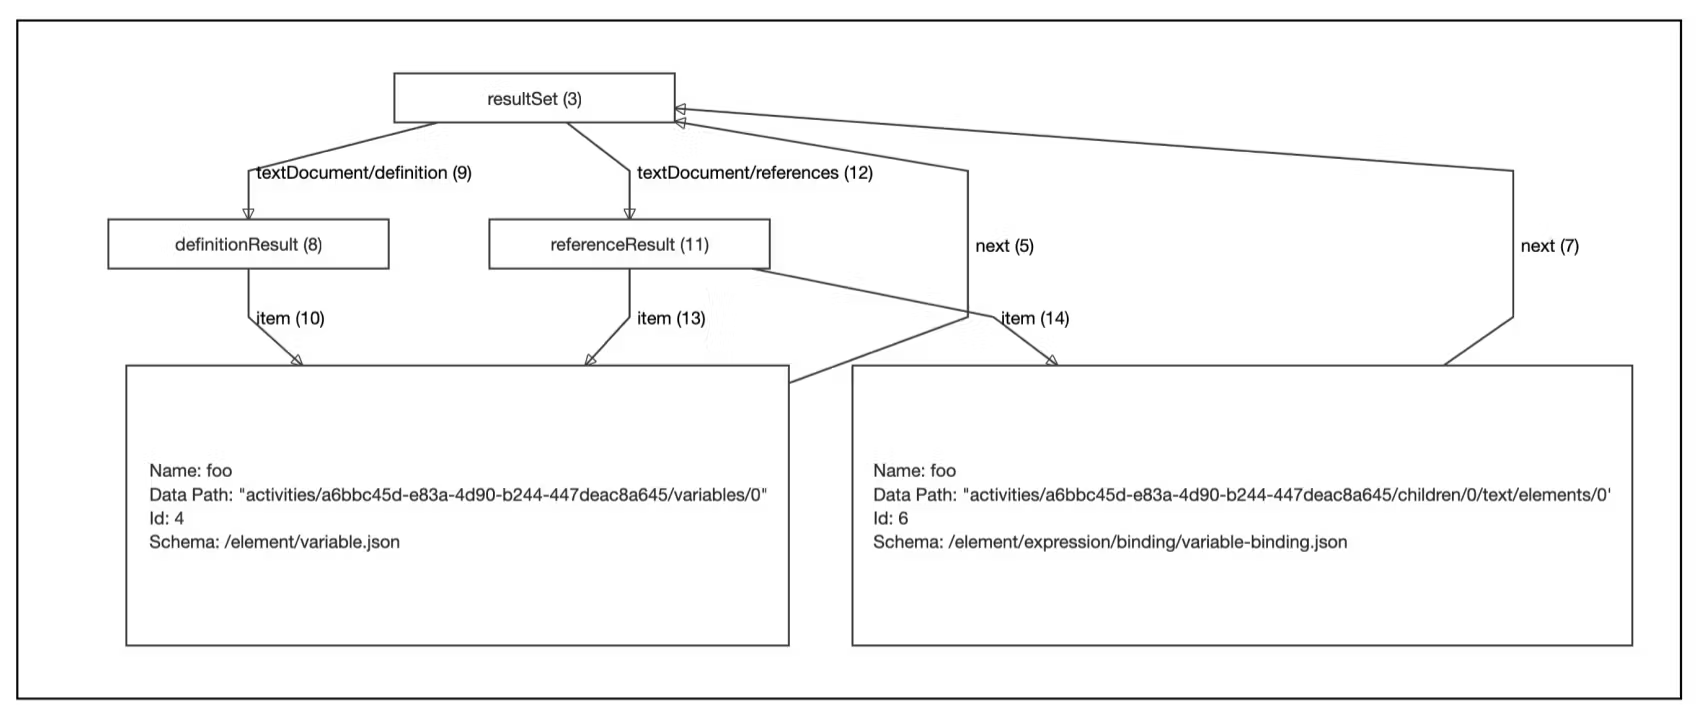
Figure 5: Using an internal tool we built to visualize the LSIF index. This connected component connects the foo variable declaration and reference
The entire app model is split into many small connected component like Figure 5. Each connected component connects a definition node with a list of reference nodes.

Figure 6: Finding usages of foo variable

Figure 7: Output of finding usages of foo variable
Finally, now that we have an LSIF index connecting the foo definition and reference, we can now query for the references of the foo variable in O(1) time. Figure 6 shows how a user could make a LSIF query to fetch references for the foo variable and Figure 7 shows the output of the query.
Implementing LSIF
The remainder of this blog post will focus on the interesting technical challenges we faced when implementing LSIF. The first challenge we had to solve for was how to modify the LSIF protocol to work with a non-textual programming language. LSIF is built for text-based programming languages: files, line numbers, and starting character are first class properties for nodes. In contrast, we store the ASTs of an application as one JSON tree.
This wasn’t difficult though — we just had to find a way to uniquely identify any Airkit element in the JSON tree. While normal files can use line numbers and character count to uniquely identify symbols, we can use the data path, which is the absolute path from the root of the JSON tree to uniquely identify an element. After figuring out the protocol, we needed to design the LSIF indexer.
Designing the Indexer
LSIF is just a data format; there aren’t any documentations on how to build the LSIF index. Here are some of the major decisions we had to make about the indexer:
- Do we update the index synchronously or asynchronously?
- Does the index live on the client or the server?
- Do we persist the index?
Our team discussed many approaches and here are some of the tradeoffs for each of them.
Approach #1: Synchronous Updates on the Client Side
Currently, each client has a state manager (redux) that holds the app definition. When a user edits an app, a command is dispatched to the state manager to apply the commands to the app definition. Our initial approach was to also have the LSIF indexer live on the client. Whenever the state manager received a command, it would pass the new app definition to the LSIF indexer to rebuild the index each time.

The advantage of synchronous updates is that the LSIF index is always guaranteed to be up-to-date. Figure 8 shows the communication between the different components of the system: the user, the state manager, and the LSIF indexer. Time flows from left to right. Each request or response message is represented by an arrow.
In the example, the update to the LSIF index is performed synchronously. The coordinator waits for the indexer to finish indexing before reporting success to the user. This guarantees that when the user makes a request to the LSIF Indexer, the LSIF Indexer is up-to-date with the latest changes the user submitted.
The disadvantage of this approach is that since both the state manager and the LSIF Indexer reside on the client, and because javascript is single threaded, the UI thread would be blocked every time a user makes a change to the app until the state manager responds with success.
Approach #2: Asynchronous Updates - Server Side Indexing
To not block the UI thread when the LSIF indexer updates the index, we can move the LSIF indexer onto a server, making updates to the LSIF asynchronous.
With asynchronous updates, there is a problem. As seen in Figure 9, if the user queries LSIF shortly after making a write, the data changes may not yet have reached the LSIF index. If the user queries the LSIF index, it will look like the data they submitted was lost, so they will be confused.
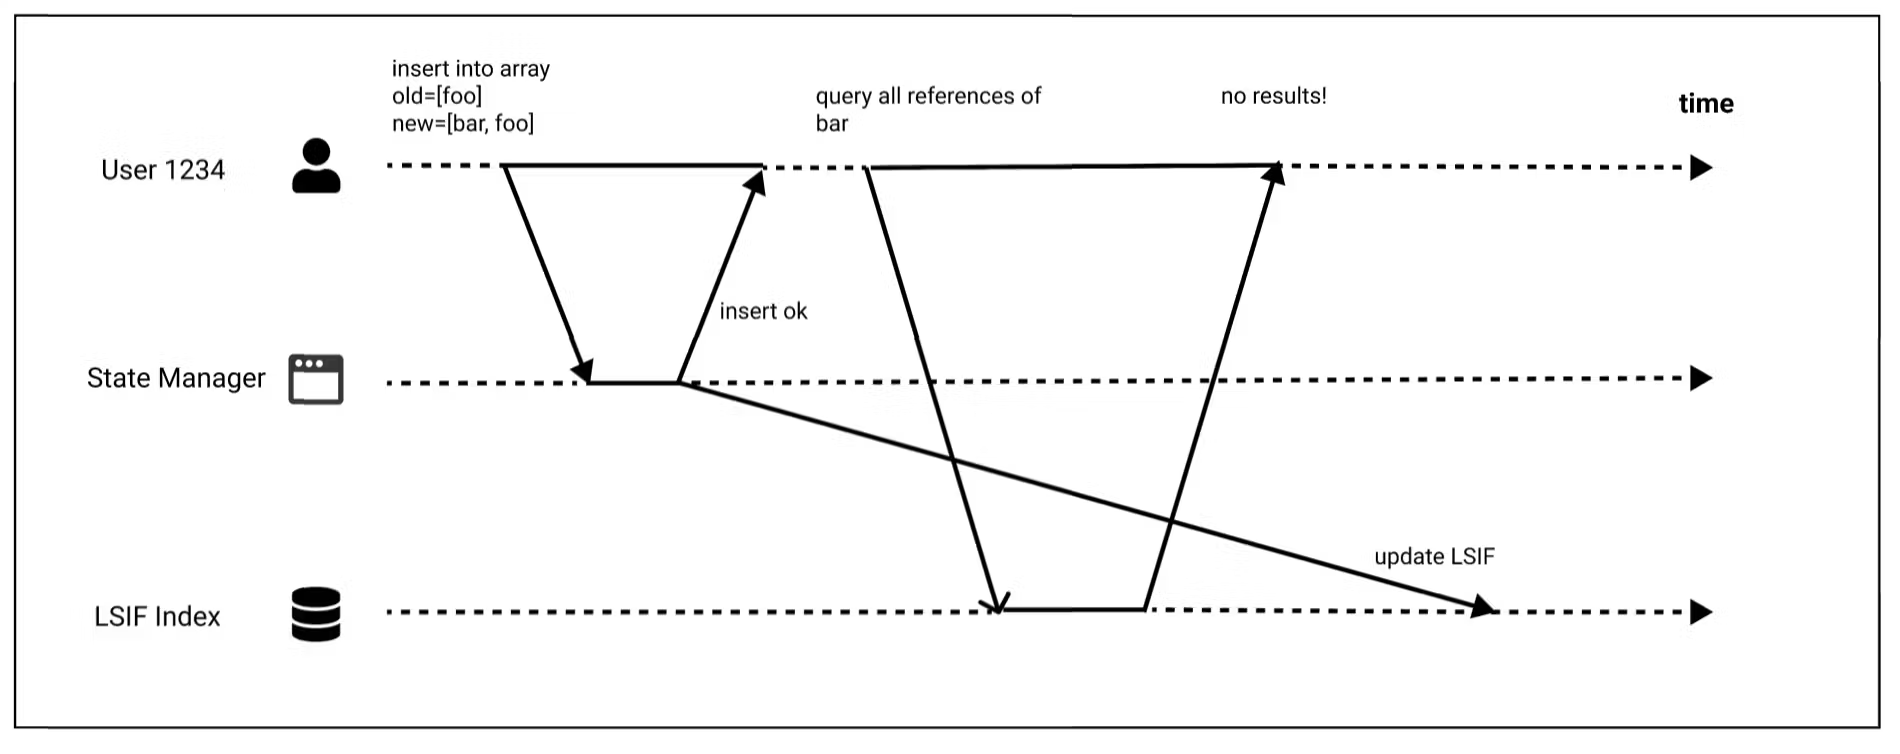
Figure 9: A user makes a write, followed by a query to find all references to the newly inserted variable.
In this scenario, we need read-after-write consistency, also known as read-your-writes consistency. This consistency model guarantees that if a user makes a change to the app model and subsequently makes a request to the LSIF index, the index will be up-to-date with the the changes made by the user.
There are various ways to achieve read-after-write consistency with asynchronous updates. One way is to have the client remember the timestamp of its most recent write. Then we just need to make sure the LSIF index won’t respond to any requests until it is up-to-date with the timestamp of the request. Instead of the actual system clock, we can use a logical timestamp, such as the log sequence number formed by the commands the user submits to the state manager.
The advantage to asynchronous updates is that the state manager can respond success to the user before LSIF indexer finishes updating the index. The disadvantage is the additional cost of the servers and the latency when making requests to the server. In addition, we would need to make the indexer fault tolerant. And, if we wanted to protect the indexers against a single node failure or network outage, we would need to make the indexers distributed.
Approach #3: Asynchronous Updates with Background Thread (Web Worker)
A similar approach to server-side indexing is to store and build the LSIF index in a background thread, such as a web worker (the worker thread can perform tasks without interfering with the user interface). The problem of this approach is similar to the problems of server-side indexing — if the system doesn’t guarantee read-after-write consistency, the LSIF may be outdated for a split second.
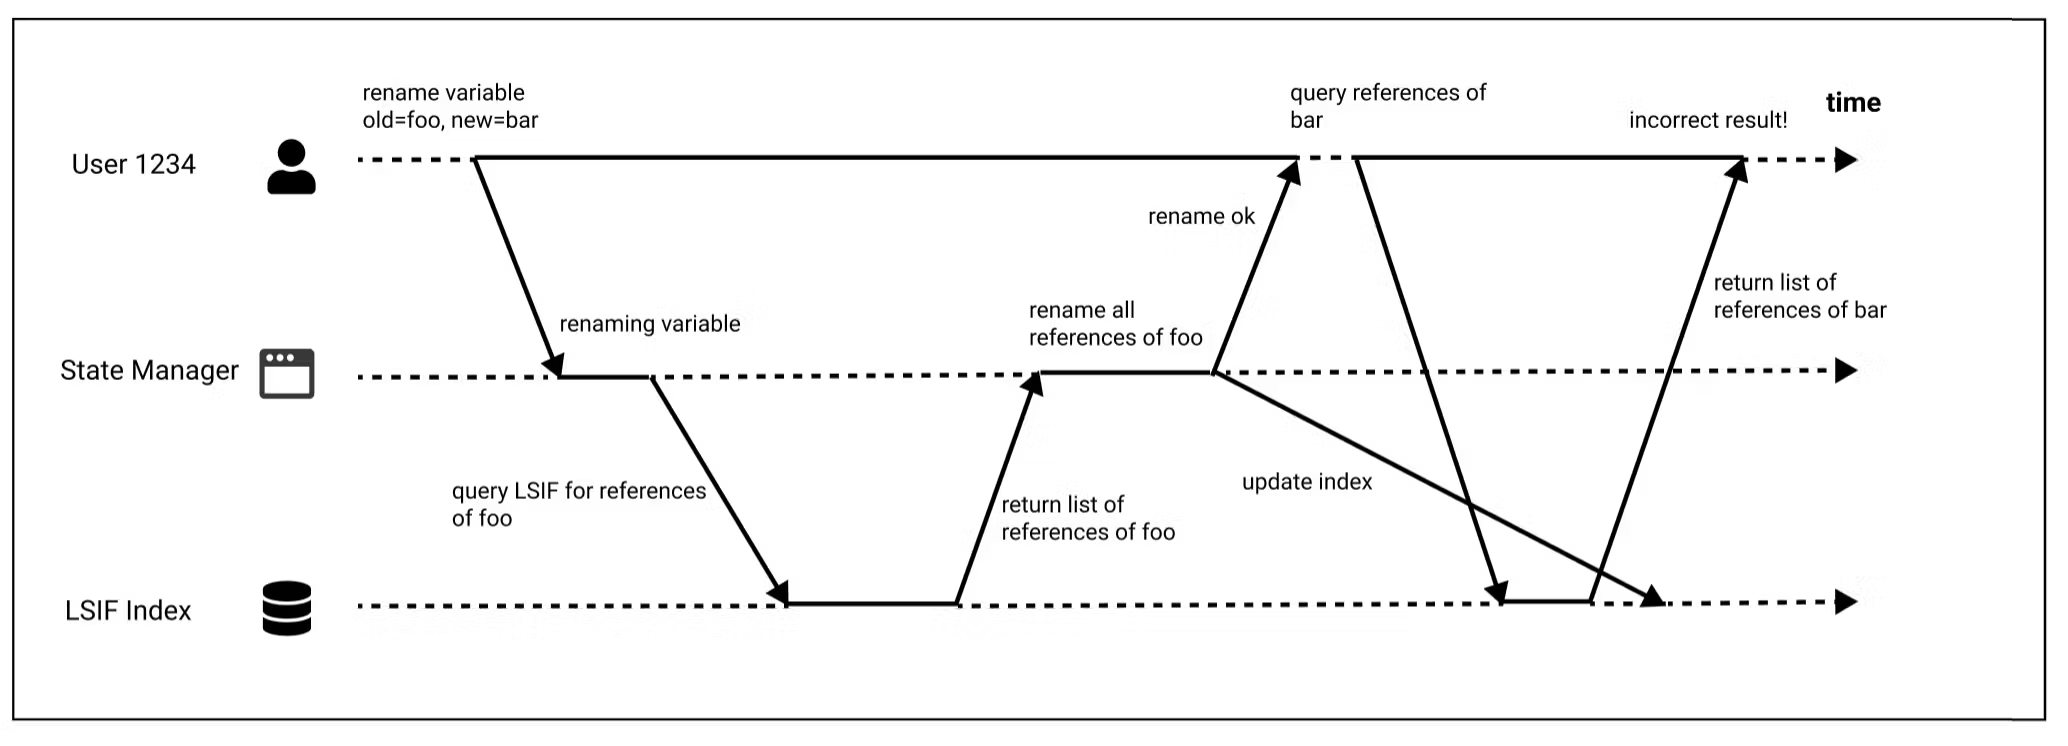
Figure 10: A user renames a variable. The user queries the LSIF index before it is updated.
This is the flow for renaming variables:
- user submits a rename variable request to state manager to change the variable name from foo to bar
- state manager renames the variable, then makes a request to LSIF index for all references of foo
- after retrieving all references, state manager renames variables then responds to user with success
- state manager then updates the LSIF index
Suppose a user queries LSIF before state manager updates the LSIF in stage 4, then the user would get out-dated data. This is seen in Figure 10 when the user renames a foo variable to bar, then queries the references of bar, but doesn’t get the renamed bar variables in return.
The advantage of background thread is that laborious processing can be performed on a separate thread, allowing the UI thread to run without being blocked. The disadvantage of a web worker is the additional complexity to guarantee read-after-write consistency and the additional complexity to prevent memory leaks, etc.
Approach #4: Incremental Updates
Instead of rebuilding LSIF index each time there is a write, we could perform incremental updates in real time. This way, we could synchronously update the LSIF index. However, incremental updates come with some interesting technical challenges:
Suppose we have two global variables.
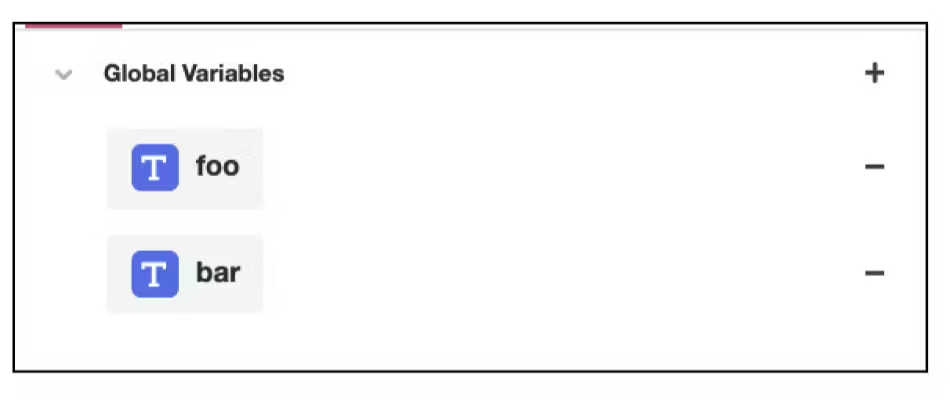
Figure 11: Declaring two global variables, foo and bar

Figure 12: Initial value of the array

Figure 13: Inserting baz to the first index of the array
The user inserts a baz variable (Figure 13) to an array (Figure 12). How might we incrementally update the LSIF index to the changes made that takes us from Figure 12 to Figure 13?
You might be thinking - since an array is a tree such that each child has its index as its key, can’t we just traverse to the array, increment the index of foo and bar by 1 and insert the baz variable into the graph? Unfortunately, things aren’t as easy as it seems. While the three variables — baz, foo, bar — are semantically connected by the array, they are actually not connected in the LSIF graph. Figure 14 shows that foo and bar are actually two disconnected components.

Figure 14: LSIF graph for [foo, bar] before inserting baz into position 0. There are two disconnected components — one for foo and one for bar.
The challenge of building LSIF incrementally is that nodes in the app model that have semantic connections might not be connected in the LSIF graph. This makes it difficult to update data paths when we insert into an array. It also makes it tricky to garbage collect the graph when a parent node is deleted, since we need to recursively find all its children and delete them.
To solve this problem, we need a reverse index where we can search for a node by data path with a prefix. In the example provided in Figure 13, we need to search foo and bar by the data path elements/ and shift them by one. A good data structure for this would be a trie. Tries are ordered tree data structure for strings, each node is associated with a string inferred from the position of the node in the tree. Tries are also called prefix trees and can be searched by prefixes. All descendants of a node have a common prefix of the string associated with that node. The search/insertion/deletion time is linear to the length of term and key. Using a trie would allow us to find child of a parent node given the parent node’s data path very easily.
The disadvantage of using a trie is the time and space complexity to index it. Furthermore, as of now, we decided to not store the LSIF index to reduce scope of this project. This would increase the initial load time of an application by O(mn) where m is the number of nodes in an application. The number of nodes of an application can range from 200~1000 for normal apps, which makes the load time not trivial.
Choosing an Approach
In an ideal world, if we could develop a robust and efficient incremental update algorithm, we would be able to avoid tricky race conditions with fast, synchronous updates. The problem with the approach is that it is error-prone and difficult to implement and maintain. In addition, unlike some projects that can be shipped piece by piece without fully completing, an LSIF indexer either works or it doesn’t. As a result, the incremental update approach is even riskier.
The initial prototype we built was to rebuild the entire LSIF index synchronously after each user update. Driven by the KISS (keep it simple, stupid) approach, we decided to test how far this approach would go. To test the performance, we tested apps with JSON file ranging 0.1 mb to 4 mb. Most apps are less than 1 mb, and it takes roughly 10ms to 100ms to index apps of that size, with roughly increasing order of time against size of app. The biggest app we tested was 4 mb and had more than more than 180,000 lines of JSON and over 37,000 Airkit elements. To rebuild the LSIF index would take roughly 600ms on average.
Given that one of Airkit’s core value is impact, we ultimately feel that for now, the performance of the naive LSIF indexer is good enough for most apps. It also allows us to not have to deal with race conditions or to maintain additional servers / web workers.
Conclusion
We may have explored many winding paths to build the LSIF indexer, but in the end we were able to find a practical solution that allowed us to deliver the functionalities we were hoping to deliver. While this solution wasn’t the most optimal in terms of performance, it allowed us to make the biggest impact in a relatively short period of time.